how to rename folder with "con"

how to rename folder with con well here is trhe trick frnds

It's not that weird. 'con' is a reserved word from the old DOS days, simply meaning 'console'. If you wanted to create a new text file in DOS you could type 'copy con newfile.txt' meaning copy from the console to newfile.txt. This would let you type some lines and when you ended the file with ^Z (DOSish for 'end of file') you would have a file called newfile.txt containing whatever you wrote in the console. This is indeed still possible in the Windows XP console, and can you see what mess it would cause if you let files or folders have the name 'con'? What would 'copy con newfile.txt' then mean?

Also the following list of other DOS devices cannot be used as folder names:
CON, PRN, AUX, CLOCK$, NUL, COM1, COM2, COM3, COM4, COM5, COM6, COM7, COM8, COM9, LPT1, LPT2, LPT3, LPT4, LPT5, LPT6, LPT7, LPT8, and LPT9.

But yes u can still rename it and delete and i have done it lot of time, well u can also do it.

mkdir \\.\d:\con
mkdir con\
mkdir \\?\d:\con


all these work.... with any device name, con, lpt1...lpt9, prn etc
1 comments:

Folder Backgrounds - Customizing

this is simple trick only works in any drive or a folder within a drive(not works in a folder ina folder in any drives)

So how can you add a background image in afolder ina folder that in any drive

Here i will tell you the trick ,this trick also includes changing of colour of fonts that used to name a folder or files in that folder


Select the folder you want to use for your background wallpaper. You MUST convert the folder you want to use to
a SYSTEM folder. At the command prompt screen (Start/Run/CMD) which looks something like this: c:\> type this command: attrib +s c:\myfolder and then hit the return key.

Copy and paste the script below into Notepad and change the line that says IconArea_Image to point to the directory
and the file that you want to use for the background image.

[ExtShellFolderViews]
{BE098140-A513-11D0-A3A4-00C04FD706EC}={BE098140-A513-11D0-A3A4-00C04FD706EC}

[{BE098140-A513-11D0-A3A4-00C04FD706EC}]
Attributes=1
IconArea_Image=C:\YOUR LOCATION\OF\ANY\IMAGE.JPG
IconArea_Text=0x00000000

The last line in the script tells Windows what color the font will be when you read the files in that folder. For instance:

0x00000000 = black
0x00FF0000 = blue
0x0000FF00 = green
0x000000FF = red
0x00C000C0 = purple

Now save the file you just created as desktop.ini and place it into the directory you just converted into a system folder.
Now close that folder and then reopen.
Tip: If a folder uses the wrong background picture and you can't change it: Start/Run/Regedit and remove this key:
HKEY_CURRENT_USER\Software\Microsoft\Windows\Shell\Bags.

1 comments:

MAKING LINK WITH NAME SERVERS(PHISING HACK TRICK)

Here i am going to tell you how to Make co-cc Pages ( With NameServers )

So you can make a link with co.cc that will redirect to your fake login page

it absolutely look like a link to any website so we can misunderstand the victim

(it will look like www . playboy . co . cc)

First of All For doing This You Need To Make Any Account On FreeWebHostings

Like in My3gb-Com/Justfree-Com

So If You Are Making account on My3gb The Process Goes Like This (This is same for many hostings)

1) Make An Account On Co-Cc

for this goto this link http://www.co.cc/?id=183970
.In there you can see a box to check your domain name availability
type your name and click check availability if available go to registration process
(if not available check another name)

2) Register A Domain On It. Ex:- playboy . co . cc
After registration complete login to your account


3) Open Manage Domain,select your domain and click setup

4) Select NameServers
In First Box Write ns1-urhosting-com and in Second Box Write ns2-urhosting-com. (Ex if you are making on my3gb-com :- ns1-my3gb-com & ns2-my3gb-com)

5)Then just under ir there is another option URL forwarding
In the box redirect to(URL) type youre link to fake login page
(Ex: www . your username . my3gb . com\orkutlogin . htm)


6) Make An Account On My3gb-Com (If You Don't Have Any)login to your account


7) Go To Account Settings And In "Extra Domain" Write Your Co-Cc Account. Ex:- playboy . co .cc

8)And you are done

The Domain name that you created willbe the link to your fake login page

1 comments:

How To: Change Your Ip In Less Then 1 Minute

hi frnds here is the trick to change ip address in few steps

1. Click on "Start" in the bottom left hand corner of screen
2. Click on "Run"
3. Type in "command" and hit ok

You should now be at an MSDOS prompt screen.

4. Type "ipconfig /release" just like that, and hit "enter"
5. Type "exit" and leave the prompt
6. Right-click on "Network Places" or "My Network Places" on your desktop.
7. Click on "properties"

You should now be on a screen with something titled "Local Area Connection", or something close to that, and, if you have a network hooked up, all of your other networks.

8. Right click on "Local Area Connection" and click "properties"
9. Double-click on the "Internet Protocol (TCP/IP)" from the list under the "General" tab
10. Click on "Use the following IP address" under the "General" tab
11. Create an IP address (It doesn't matter what it is. I just type 1 and 2 until i fill the area up).
12. Press "Tab" and it should automatically fill in the "Subnet Mask" section with default numbers.
13. Hit the "Ok" button here
14. Hit the "Ok" button again

You should now be back to the "Local Area Connection" screen.

15. Right-click back on "Local Area Connection" and go to properties again.
16. Go back to the "TCP/IP" settings
17. This time, select "Obtain an IP address automatically"
tongue.gif 18. Hit "Ok"
19. Hit "Ok" again
20. You now have a new IP address

With a little practice, you can easily get this process down to 15 seconds.

P.S:
This only changes your dynamic IP address, not your ISP/IP address. If you plan on hacking a website with this trick be extremely careful, because if they try a little, they can trace it back


add the open cmd prompt to folder context menus

copy what's in the code area to notepad and save as cmd here.reg

CODE

Windows Registry Editor Version 5.00

[HKEY_CLASSES_ROOT\Drive\shell\cmd]
@="Command Prompt"

[HKEY_CLASSES_ROOT\Drive\shell\cmd\command]
@="cmd.exe /k \"cd %L\""

[HKEY_CLASSES_ROOT\Directory\shell\cmd]
@="Command Prompt"

[HKEY_CLASSES_ROOT\Directory\shell\cmd\command]
@="cmd.exe /k \"cd %L\""

[HKEY_LOCAL_MACHINE\SOFTWARE\Classes\CLSID\{20D04FE0-3AEA-1069-A2D8-08002B30309D}\shell\cmd]
@="Command Prompt"

[HKEY_LOCAL_MACHINE\SOFTWARE\Classes\CLSID\{20D04FE0-3AEA-1069-A2D8-08002B30309D}\shell\cmd\command]
@="cmd.exe /k \"cd %L\""

1 comments:

Background image in pendrive

Here is a simple tweak to create a background in your pendrive

1.Open notepad(For that click start ,choose run ,type notepad in the box and hit enter)
2.Copy and paste the following line in your notepad

[ExtshellFolderViews]
{BE098140-A513-11D0-A3A4-00C04FD706EC}={BE098140-A513-11D0-A­3A4-00C04FD706EC}
[{BE098140-A513-11D0-A3A4-00C04FD706EC}]
IconArea_Image=test.jpg

3.Click file menu on top of notepad
4.Select sava as, then select desktop in save in box.then type 'desktop.ini' in the file name box, Hit save
5.now you can see a file named 'desktop.ini" in your desktop
6.Copy the file to your pendrive
7.Select the desired picture you need to set as background image ,Rename it to test.jpg and copy it to your pendrive(strongly recommended to use light shaded picures)
8.Hit F5 , Now you can see difference

You can also do same technic to your hard drive

1 comments:

Change Icon of batch and .vbs files to make them look real..

If you need to change the icon for any file type, just do the following:

1) Go to 'My Computer'
2) Click on 'tools' then 'folder options'
3) Click on 'file types'
4) Scroll down to the file type you want to change the icon for (eg .vbs in this case)
5) Click on 'advanced'
6) On the top you will see 'change icon'

Change the icon to whatever you want (you can also change te icon to any exe files icon, just browse to program files and search a suitable icon...) and after hitting OK they should all switched to the new icon.


Alternately if you just want to change it for a single .VBS file or.bat file, you are sorta out of luck. The closest thing you can do is to create a shortcut of the .vbs file and then change the shortcut icon under 'right click -> properties'

1 comments:

Trick to Hide your files & folders in IMAGE

This is a simple trick to hide your important files/folder in a picture file ,when any other person try to open this file ,he/she can only see the picture(but there is lot of files hide in that picture ).For the trick you need to install wirar in your computer,if you already have then goto the steps

1)First create a folder in any drive ,and rename it to anyname like "abc"

2)Move the files and folders that you want to hide in the picture to this folder(abc)


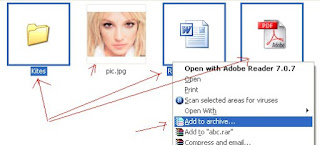
3)Select all the files and folders you want hide and right click-select add to achive,click ok

Now all these files and folders are compressed in a rar file ,a new rar file created
(you can type anyname, here it is abc.rar)

4)copy a good picture(jpg file) to this folder(This is the picture, in that you are going to hide your files)

5)Open cmd(click start-run-type cmd click ok)
goto the drive in command and then goto the folder using cd command

type the following command
copy /b pic.jpg + abc.rar pic.jpg
press enter
Here pic.jpg will be the name of the picture file
Then you can see 1 file copied


6)Now your files are hided in the picture pic.jpg.You can delete all other files and folders

7)Anyone double click in this picure it will open as a picture
if you want to see the files in that pic-right click openwith winrar


Enjoy. . .!

0 comments:

hide ur hard disk

How to Hide the drives(c:,d:,e:,a:...etc)
This is a great trick you can play on your friends. To disable the display of local or networked drives when you click My Computer.


1.Go to start->run.Type regedit.Now go to:

HKEY_CURRENT_USER\Software\Microsoft\Windows\CurrentVersion\Policies\Explorer

Now in the right pane create a new DWORD item and name it NoDrives(it is case sensitive). Now modify it's value and set it to 3FFFFFF (Hexadecimal) .Now restart your computer. So, now when you click on My Computer, no drives will be shown(all gone...). To enable display of drives in My Computer, simply delete this DWORD item that you created.Again restart your computer.You can now see all the drives again. Magic..........

1 comments:

нσω тσ яємσνє ѕнσят¢υт ѕιgη ƒяσм ∂єѕктσρ ι¢σηѕ

this is one more registry tweak which can help you in improving your desktop appearance by their shortcut signs.

follow the steps below to do it successfully

1. go to start-> run-> type"regedit"
2. now goto "hkey_classes_root"
3. no goto the the "lnkfile", click on it
4. now see on the right side and delete file "isshortcut"
5. now aagain come to left side and find find "pipfile", delette that.
6. now close everything and restart your computer, the shortcut arraw will be removed

0 comments:

Run More than one GTalk in same computer

This is a simple Gtalk trick by which many users can login in gtalk in a single system without any software or patch.
Follow these steps-

1-click on start --> all programs --> Google Talk
2-right click on Google Talk icon and click on properties.
3-In properties dialog box
Target: "C:\Program Files\Google\Google Talk\googletalk.exe" /startmenu
4-replace startmenu with nomutex
then press OK

restart Gtalk and enjoy multiple login..

0 comments:

open multiple yahoo id's in same computer

You can login with multiple id's on yahoo messenger without any download or patch. Only thing you have to do is a change in windows registry.
Follow these steps :

1. click on Start --> Run . Type regedit, then enter .
2. Navigate to HKEY_CURRENT_USER --> Software --> yahoo -->pager-->Test
3. On the right page , right-click and choose new Dword value .
4. Rename it as Plural.
5. Double click and assign a decimal value of 1.

Its done!!
Now close registry and restart yahoo messenger and enjoy multiple login...

1 comments:

change the text of xp start button

Step 1 - Modify Explorer.exe File
In order to make the changes, the file explorer.exe located at C:\Windows needs to be edited. Since explorer.exe is a binary file it requires a special editor. For purposes of this article I have used Resource Hacker. Resource HackerTM is a freeware utility to view, modify, rename, add, delete and extract resources in 32bit Windows executables and resource files (*.res). It incorporates an internal resource script compiler and decompiler and works on Microsoft Windows 95/98/ME, Windows NT, Windows 2000 and Windows XP operating systems.
get this from h**p://delphi.icm.edu.pl/ftp/tools/ResHack.zip
The first step is to make a backup copy of the file explorer.exe located at C:\Windows\explorer. Place it in a folder somewhere on your hard drive where it will be safe. Start Resource Hacker and open explorer.exe located at C:\Windows\explorer.exe.

The category we are going to be using is "String Table". Expand it by clicking the plus sign then navigate down to and expand string 37 followed by highlighting 1033. If you are using the Classic Layout rather than the XP Layout, use number 38. The right hand pane will display the stringtable. We’re going to modify item 578, currently showing the word “start” just as it displays on the current Start button.

There is no magic here. Just double click on the word “start” so that it’s highlighted, making sure the quotation marks are not part of the highlight. They need to remain in place, surrounding the new text that you’ll type. Go ahead and type your new entry. In my case I used Click Me!

You’ll notice that after the new text string has been entered the Compile Script button that was grayed out is now active. I won’t get into what’s involved in compiling a script, but suffice it to say it’s going to make this exercise worthwhile. Click Compile Script and then save the altered file using the Save As command on the File Menu. Do not use the Save command – Make sure to use the Save As command and choose a name for the file. Save with newly name ...

0 comments:

lock ur hard disk without using software

Lock Drive Without Any Software

Step 1 : Goto "RUN" and type "gpedit.msc"

Step 2 : A window will be opened (Group Policy).You will find two options in left side of the page.

Step 3 : Drop down the "user configuration" and again drop down sub menu "Administrative Templates" and again drop down another sub menu "Windows Components" and click on "Windows Explorer". Now see the right pane.

Step 4 : Right click on "Prevent Access To Drives From My Computers" and then click on properties.

Step 5 : Click on the radio button "Enabled" and you can select any option in the menu. (Pick one of the following combination)

Step 6 : Follow the same procedure for disabling it.

1 comments:

add copy to,move to, option in ur right click menu

Add Copy To/Move To option on Right Click

Copy the following on a note pad and save it as anything.reg, Run the file....

Windows Registry Editor Version 5.00

[HKEY_CLASSES_ROOT\AllFilesystemObjects\shellex\ContextMenuHandlers]

[HKEY_CLASSES_ROOT\AllFilesystemObjects\shellex\ContextMenuHandlers\Copy To]
@="{C2FBB630-2971-11D1-A18C-00C04FD75D13}"

[HKEY_CLASSES_ROOT\AllFilesystemObjects\shellex\ContextMenuHandlers\Move To]
@="{C2FBB631-2971-11D1-A18C-00C04FD75D13}"

0 comments:

Finding IP Address in Gmail / Yahoomail / Hotmail

Finding IP Address in Gmail / Yahoomail / Hotmail

When you receive an email, you receive more than just the message. The email comes with headers that carry important information that can tell where the email was sent from and possibly who sent it. For that, you would need to find the IP address of the sender. The Tutorial below can help you find the IP address of the sender. Note that this will not work if the sender uses anonymous proxy servers.

First of all, the IP address is generally found in the headers enclosed between square brackets, for instance, [129.130.1.1]

Finding IP address in Gmail
Log into your Gmail account with your username and password.
Open the mail.
To display the email headers,
Click on the inverted triangle beside Reply. Select Show Original.
Manually find the IP address, proceed to 5.
Look for Received: from followed by the IP address between square brackets [ ].
Received: from [69.138.30.1] by web4587.mail.***.yahoo.com
If you find more than one Received: from patterns, select the last one.
Track the IP address of the sender
Finding IP address in Yahoo! Mail
Log into your Yahoo! mail with your username and password.
Click on Inbox or whichever folder you have stored your mail.
Open the mail.

If you do not see the headers above the mail message, your headers are not displayed. To display the headers,

* Click on Options on the top-right corner
* In the Mail Options page, click on General Preferences
* Scroll down to Messages where you have the Headers option
* Make sure that Show all headers on incoming messages is selected
* Click on the Save button
* Go back to the mails and open that mail

You should see similar headers like above
Or if you want to manually find the IP address, proceed to 6.
Look for Received: from followed by the IP address between square brackets [ ]. Here, it is 202.65.138.109.
That is be the IP address of the sender.

If there are many instances of Received: from with the IP address, select the IP address in the last pattern. If there are no instances of Received: from with the IP address, select the first IP address in X-Originating-IP.
Track the IP addess of sender
Finding IP address in Hotmail
Log into your Hotmail account with your username and password.
Click on the Mail tab on the top.

Open the mail.
If you do not see the headers above the mail message, your headers are not displayed. To display the headers,
* Click on Options on the top-right corner
* In the Mail Options page, click on Mail Display Settings
* In Message Headers, make sure Advanced option is checked
* Click on Ok button
* Go back to the mails and open that mail
You should see the email headers now.
Manually find the IP address, proceed to 7.
If you find a header with X-Originating-IP: followed by an IP address, that is the senders IP address
Hotmail headers
In this case the IP address of the sender is [68.34.60.59].
If you find a header with Received: from followed by a Gmail proxy like this

Hotmail headers
Look for Received: from followed by IP address within square brackets[]
In this case, the IP address of the sender is [69.140.7.58].
Or else if you have headers like this
Hotmail headers
Look for Received: from followed by IP address within square brackets[].
In this case, the IP address of the sender is [61.83.145.129] (Spam mail).
If you have multiple Received: from headers, eliminate the ones that have proxy.anyknownserver.com.
Track the IP address of the sender

1 comments:

Delete An "undeletable" File

Delete An "undeletable" File

Open a Command Prompt window and leave it open.
Close all open programs.
Click Start, Run and enter TASKMGR.EXE
Go to the Processes tab and End Process on Explorer.exe.
Leave Task Manager open.
Go back to the Command Prompt window and change to the directory the AVI (or other undeletable file) is located in.
At the command prompt type DEL where is the file you wish to delete.
Go back to Task Manager, click File, New Task and enter EXPLORER.EXE to restart the GUI shell.
Close Task Manager.


Or you can try this

Open Notepad.exe

Click File>Save As..>

locate the folder where ur undeletable file is

Choose 'All files' from the file type box

click once on the file u wanna delete so its name appears in the 'filename' box

put a " at the start and end of the filename
(the filename should have the extension of the undeletable file so it will overwrite it)

click save,

It should ask u to overwrite the existing file, choose yes and u can delete it as normal


Here's a manual way of doing it. I'll take this off once you put into your first post zain.

1. Start
2. Run
3. Type: command
4. To move into a directory type: cd c:\*** (The stars stand for your folder)
5. If you cannot access the folder because it has spaces for example Program Files or Kazaa Lite folder you have to do the following. instead of typing in the full folder name only take the first 6 letters then put a ~ and then 1 without spaces. Example: cd c:\progra~1\kazaal~1
6. Once your in the folder the non-deletable file it in type in dir - a list will come up with everything inside.
7. Now to delete the file type in del ***.bmp, txt, jpg, avi, etc... And if the file name has spaces you would use the special 1st 6 letters followed by a ~ and a 1 rule. Example: if your file name was bad file.bmp you would type once in the specific folder thorugh command, del badfil~1.bmp and your file should be gone. Make sure to type in the correct extension.

0 comments:

Folder lock using DOS and no software

Folder lock using DOS and no software

when you hide a folder and may think that now the folder is protected, but actually it can seen by anybody who select the option "show hidden files and folders" from folder option window. if you want to hide a folder which is just unnoticeable then just hide it using DOS.

follow the steps below to do it successfully

1. suppose the folder you want to hide is d:/technism
2. To hide and lock goto "cmd prompt" and
type in "d:\attrib technism +s +h "(without double course)
3. To view and unlock goto "cmd prompt" and
type in "d:\attrib technism -s -h " (without double course)

0 comments:

●๋•нσω тσ σρєη α вℓσ¢кє∂ ωєвѕιтє ωιтнσυт αηソ ѕσƒтωαяє●๋•

●๋•нσω тσ σρєη α вℓσ¢кє∂ ωєвѕιтє ωιтнσυт αηソ ѕσƒтωαяє●๋•

most of the time the time the firewall of an office environment or college environment use domain name to block the website. then you have an option to access that website using its IP address. so this time i am going tell you how to generate IP address of any website

follow the steps below to do it successfully

1. go to start-> run-> type"cmd"
2. now type "tracert orkut.com" in case you want to access orkut.com
3. now the process will start for tracing "orkut.com".
4. the first line in the tracing machanism will say "Tracing route to google.co.in [209.85.231.104]", now the IP address in bracket is the IP address to that website
5. now all you have to do is just type the IP address in your browser url area. and you will be able to access the blocked website.
6. remember this trick will not not work if firewall has blocked the IP addresss instead of domain name.

0 comments:

hack administrator passwords

hack administrator passwords
its simple guyz
# Get the machine to boot from CD (or floppy)
# Floppy version need to swap floppy to load drivers.
# Load drivers (usually automatic, but possible to run manual select)
# Disk select, tell which disk contains the Windows system. Optionally you will have to load drivers.
# PATH select, where on the disk is the system?
# File select, which parts of registry to load, based on what you want to do.
# Password reset or other registry edit.
# Write back to disk
http://rapidshare.com/files/259520158/cd060213.zip.html
download and make image cd of this
and follow the instructions

0 comments: